Author Archives: Sarah

CSA Produce: Swiss Chard

By Sarah

There’s something I’ve been wanting to share with you. It’s making this summer my favorite of all those I’ve spent in New York (out of nearly four whole summers!). And it’s something I never thought I would get so excited about.

Have you guessed what it is?

Vegetables!

But not just any vegetables. Fresh, seasonal, and locally grown vegetables. Vegetables from Stoneledge Farm through their community supported agriculture initiative. It’s a way for us to support a local farm, purchasing a share of their produce before we have much of an idea of what that produce will be. And we get great vegetables at a great price, weekly delivered to a location in Manhattan just blocks away from our apartment. Kind of sounds like a win-win situation, huh? And that’s even before you’ve tasted any sugar snap peas.

Then there’s the best part, the element of surprise. Every week we get a new assortment of produce, some things we’re not sure what to do with, some things we love, and some things which are downright bizarre. And the result is us ad libbing, making do with the vegetables we were given for the week, trying a couple of potentially fantastic recipes, and consuming the other items in any way possible. Because if there’s one thing I hate, it’s food going to waste.

So here’s where the blog comes in. We’ve already been getting and eating our vegetables for several weeks, but now we will periodically post on one of the vegetables. We’ll tell you what we did with it, even if it was something really simple, and whether the result was fantastic or not. And you’ll keep us honest. So if we’re talking about those sugar snap peas in October, you know we’ve been shirking our duties. If nothing else, the entire process will help us avoid only posting dessert recipes. We might even post a mystery item now and then and you can help us come up with a way to use it. What do you think?

We’re going to begin with swiss chard, mainly because the rainbow variety the csa has provided us with allowed Andrés to take that beautiful picture above. Isn’t it gorgeous? Doesn’t it just make you want to throw it up in the air like confetti?

Well instead of throwing it, confetti style, we sauteed it with onions. And somehow it warped into what is possibly the world’s most hideous vegetable. But also surprisingly delicious. We first made it for brunch alongside a thick slice of ham and one of my favorite egg dishes and, well, the best part of the meal was the swiss chard, hands down. So we made it again and found that the same preparation could be used as a deeply comforting pasta sauce, perfect for a rainy day. The recipe is so simple, but really versatile and delightful.

Sauteed Swiss Chard with Onions
From Gourmet

3 pounds Swiss chard (about 2 large bunches)
2 tablespoons olive oil
2 tablespoons unsalted butter
2 medium onions, halved lengthwise and thinly sliced
2 garlic cloves, finely chopped

Cut stems and center ribs from chard, discarding any tough portions, then cut stems and ribs crosswise into 2-inch pieces. Stack chard leaves and roll up lengthwise into cylinders. Cut cylinders crosswise to make 1-inch-wide strips.

Heat oil and butter in a large heavy pot over medium heat until foam subsides, then cook onions and garlic with 1/2 teaspoon salt and 1/4 teaspoon pepper, covered, stirring occasionally, until onions begin to soften, about 8 minutes. Add chard stems and ribs, 1/2 teaspoon salt, and 1/4 teaspoon pepper and cook, covered, stirring occasionally, until stems are just tender, about 10 minutes. Add chard leaves in batches, stirring until wilted before adding next batch, and cook, covered, stirring occasionally, until tender. Continue to cook chard until most of the liquid is gone and it is very soft. Serves eight as a side dish.

Thai cooking class

By Sarah

Way back in December my mother gave Andrés and me gift certificates for a Thai cooking class. I’m still not sure how she decided on this particular cooking class, but she did a good job because both Andrés and I love authentic Thai food. And, although it took several months to schedule the class, when we finally made it to the class it was quite a success. All eight and a half hours of it.

We made all types of dishes: Pad Thai, chicken skewers, peanut sauce, fried rice, curries, and an absolutely delightful mango sticky rice. Andrés’s  favorite dish of the day was the basil chicken (gai pad gra prow) and this may only be partly because he was behind the stove for it. And that he was allowed to add as many chilies as he wanted. This is a simple dish chock full of veggies and finished with the unique, delicious Thai basil leaves.

For me, the most valuable part of this cooking class was not the individual recipes, but the confidence it gave me to try more Thai recipes, although the ingredients may be a little foreign. Being able to see, feel, taste and smell these ingredients in their raw forms will help me find them in supermarkets and explore their virtues further. It also helps that the stems from the Thai basil plants could be transplanted and would continue to grow leaves. We brought those stems home and now have a mini garden of Thai basil plants, some of which are really flourishing. It won’t be long before we can make Gai Pad Gra Prow at home.

Gai Pad Gra Prow or Basil Chicken
Adapted from Phensri, of Fantastic Thai

1 1/2 Tbsp vegetable oil
2 medium garlic cloves, chopped
1 chicken breast, finely diced
~1 tablespoon soy sauce
~1/2 tablespoon oyster sauce
~1/2 tablespoon fish sauce
1 tsp chili paste + diced fresh chili powder (to taste)
1/4 cup sliced onion
1/4 cup sliced carrot
1/4 cup sliced bell pepper
1/4 cup string beans
~20 Thai basil leaves

Over a medium high flame, heat the oil. Add the garlic and chicken, continuously stirring until chicken is more than half cooked.* Stir in soy sauce, oyster sauce, fish sauce, and chilies, all to taste. Add vegetables and cook, continuing to stir, for about 8 minutes, until chicken is fully cooked. Mix in basil leaves and immediately remove from heat. Serve over rice. This serves two people.

Rhubarb crazy

By Sarah

This spring I have gone a little crazy. Rhubarb-crazy.

I grew up eating rhubarb and it wasn’t much different than the other exceptionally fresh vegetables we grew in our garden or got as gifts from my grandparents’ garden. When I went to college it disappeared from my culinary life, but I really didn’t miss it. Until this April. Suddenly I couldn’t go another day without eating rhubarb. I dragged Andrés and another friend to the Union Square green market only to find potatoes and apples in the rhubarb’s stead. When the first barely pink stalks finally did appear, I took dozens home with me. And ever since I have not allowed our fridge to be lacking in rhubarb.

One of the first things I made with that rhubarb was a lovely sorbet. But I also did a lot of experimenting. I found I adore rhubarb in just about all of its incarnations, but that it’s tastiest when its natural spring tartness is allowed to shine. Stewed with white sugar was better than brown sugar. Vanilla and white wine made a better compote than red wine and cinnamon. I liked real chucks in my dishes (except that sorbet) instead of just vegetable mush.  This is all a matter of personal preference of course.

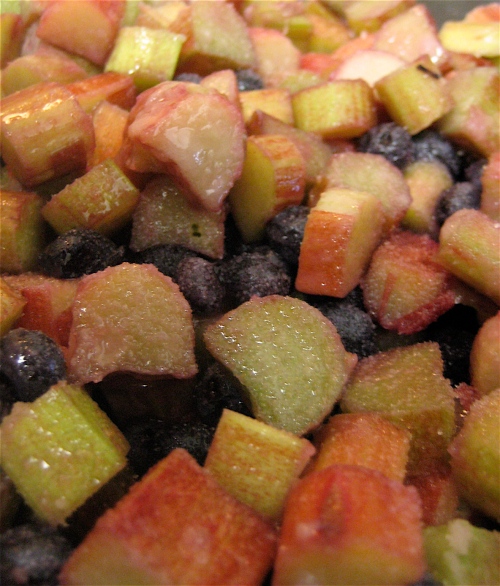
My favorite incarnation of rhubarb this spring has been this dish. The rhubarb is mixed with blueberries, a slightly nontraditional accompaniment, but one that balances it nicely. The rhubarb/berry mixture is contrasted by a crisp topping of oats, walnuts, and hazelnuts (which really steal the show). So I get both tastes: fresh fruitiness and warm, comforting goodness.

Julio liked it so much he licked the entire pan and then begged for more. I kind of wanted to do the same.

Rhubarb Blueberry Crisp

For fruit:
1/3 cup granulated sugar
4 Tbsp flour
1 1/2 pound rhubarb
2 cups blueberries  (~11 ounces, frozen worked just fine)

For topping:
1/3 cup walnuts
1/3 cup hazelnuts
1/2 cup all-purpose flour
1/2 cup old fashioned oats
1/2 cup demerara sugar (aka, sugar in the raw)
1/4 cup packed brown sugar
1/8 tsp salt
6 Tbsp cold unsalted butter, cut into pieces

Chop rhubarb is 1/2 inch pieces. In a large bowl, mix the flour and sugar, then add the rhubarb and blueberries and mix well. Transfer to a medium baking dish.

In a food processor, coarsely chop hazelnuts and walnuts. Add flour and oatmeal and mix in pulses (oatmeal will be partially ground but not as fine as a flour). Add sugar, salt, and butter to the processor and mix, in pulses, until butter is incorporated. Remove mixture from food processor and, if necessary, mix until dough forms a ball. Squeeze small amounts of dough and drop onto the rhubarb-blueberry mixture.

Bake the crisp in a preheated oven at 350 degrees for 1hr. Serve crisp warm. Lick pan (you will want to).

standard New York breakfast

By Sarah

My favorite part of living in New York City is the food. Maybe this isn’t surprising, since my favorite part of many things is the food, but you have to admit that NYC really is one of the best places to eat in the world. There’s the variety: just about every type of cuisine under the sun is represented in its five boroughs. There are the swanky places: if you’re a famous chef you just have to have a New York restaurant. And there’s even delicious classic NYC dishes: hotdogs, reuben sandwiches, cheesecake, and bagels which are emulated throughout the rest of the country.

There’s so much food in NYC that it almost seems strange that we started a blog based primarily on cooking our own food. Why bother to cook if we can find any kind of food, often as good as and sometimes even better than can be made at home, no more than a subway ride away? To begin with, we’re a couple of poor students and can’t always afford those better-than-at-home restaurant items. But even if money wasn’t an issue, we would still cook. We make food because we enjoy the process. And so sometimes we cook or bake an item that can be bought easily and cheaply in our own neighborhood, just because it sounds like fun.

On a recent Sunday morning we were enjoying a standard New York breakfast, bagels. The bagels were soft inside and just barely crisp on the edges from the toaster. We topped them with cream cheese or white fish salad, just like on other mornings. The only difference from all the other mornings on which we’ve enjoyed bagels was that the bagels were homemade, as was the white fish salad.

We found the bagels surprisingly easy to make. The secrets seem to be an overnight rise (a bread baking tip that I adore) and a slightly hard-to-find ingredient, barley malt syrup.  With just those two items, and a little bit of planning ahead, you too can enjoy a standard New York breakfast, even if you’re far away from this grand city.

Bagels
Adapted from Peter Reinhart’s Artisan Bread Every Day (we love this book)

Ingredients
1 Tbsp (21g) barley malt syrup or 1 tsp (7g) diastatic malt powder*
1 tsp (3g) instant yeast
1 1/2 tsp (10.5g) salt
1 cup plus 2 Tbsp (225g) lukewarm water (~95F)
3 1/2 (454g) cups bread flour

For poaching liquid
~3 quarts (96oz) water
1 1/2 Tbsp (28.5g) barley malt syrup
1 Tbsp (14g) baking soda
1 tsp (7g) salt

Stir malt syrup, yeast, and salt into the lukewarm water. Place the flour in a mixing bowl and pour in the malt syrup mixture. Mix on lowest speed of stand mixture with the dough hook for three minutes (or by hand with a large sturdy spoon), until well blended. The dough should form a stiff, coarse ball, and the flour should be fully hydrated; if it isn’t, stir in a little more water. Let the dough rest for 5 minutes.

Resume mixing with the dough hook on low speed for another 3 minutes (or knead by hand for 3 minutes). The dough should be stiff yet supple, with a satiny, barely tacky feeling. If necessary, knead in a little more flour. Place the dough in a clean, lightly oiled bowl, cover with plastic wrap, and allow the dough to rise at room temperature for an hour.

Prepare a sheet pan by lining it with parchment or a silicone mat, then lightly coat the parchment paper with oil. Divide the dough into 6-8 equal pieces (a typical bagel is 4 oz, but you can make them smaller if you prefer). Form each piece into a loose ball by rolling it on a flat surface with a cupped hand. (Don’t use any flour on the work surface. You may need to wipe the surface with a damp towel.) There are two methods to shape the balls:

Method 1: Poke a hole in a ball of bagel dough and gently rotate your thumb around the inside of the hole to widen it to approximately 2 1/2 inches in diameter (half of this for a mini-bagel). The dough should be as evenly stretched as possible (try to avoid thick and thin spots). I preferred this method.

Method 2: Roll out the dough into an 8-inch long rope. (This may require rolling part of the way and resting the dough for 3 minutes before extending the dough again to bring it to its full length.) Wrap the dough around the palm and back of your hand, between the thumb and forefinger, overlapping the ends by several inches. Press the overlapping ends on the counter with the palm of your hand, rocking back and forth to seal. This method is supposedly preferred by professional bagel makers, including Andrés.

Place each shaped bagel on the prepared sheet pan; mist bagels with spray oil. Cover the entire plan with plastic wrap and refrigerate the dough overnight or for up to two days.

On baking day, remove the bagels from the refrigerator 60 to 90 minutes before you plan to bake them. If you plan to top the bagels with dried onion or garlic, rehydrate those ingredients. Immediately check whether the bagels are ready for baking by using the float test: place one bagel in a bowl of cold water. If it floats, it’s ready to be poached. If the bagel sinks, shake it off, return it to the pan, and wait for another 15 – 20 minutes before testing it again. When one bagel passes the float test, they are all ready to be boiled. If you aren’t ready to boil them yet, place the bagels back into the refrigerator so they don’t overproof. Thirty minutes before baking, preheat the oven to 500 F (260C) and gather and prepare the garnishes (poppy seeds, sesame seeds, those rehydrated onions, etc).

Make the poaching liquid by bringing the 3 quarts of water (it should be at least 4 inches deep) to a boil. Lower the heat to maintain a simmer, then stir in the malt syrup, baking soda, and salt.

Gently lower each bagel into the simmering poaching liquid, adding as many as will comfortable fit into the pot. They should all float within 15 seconds. After 1 minute, turn each bagel over with a slotted spoon. Poach for another 30-60 seconds, then transfer the bagels back to the pan, domed side up. (It’s important that the parchment paper be lightly oiled or the bagels will adhere to the paper.) Sprinkle on a generous amount of the desired toppings (except cinnamon sugar, which you want to add after baking).

Transfer the pan of bagels to the oven, then lower the heat to 450F. (We never lowered the temperature, and the bagels were fine.) Bake bagels for 8 minutes, then rotate pan and check the underside of the bagels. If the undersides are too dark, place another pan under the baking sheet. Bake bagels for another 8-12 minutes, until the bagels are golden brown.

Cool bagels on a rack for at least 30 minutes. We prefer to slice and toast the bagels before serving them.

*Peter Reinhart says that you can use honey or rice syrup instead of the malt, but I would definitely try to find the malt syrup.

White Fish Salad

Ingredients
1/2 lb smoked white fish
1/2 stalk celery
~2 Tbsp mayonnaise

Separate white fish from the skin and bones, shredding it with your fingers. Coarsely chop celery and combine it with the fish. Add mayonnaise to taste. Spread on top of a nicely toasted bagel.

A seasonal fruit dessert

By Sarah

Wow. It’s been a while. I’m sorry about that. I don’t even have an excuse for you, just that we’ve been really busy trying to enjoy the spring. We’ve been wandering through Central Park, looking at the flowers. We’ve been standing in line in Madison Square Park to get a ‘shroom burger. We’ve been running along the river. We’ve been growing herbs in pots by the window. We’ve been going to the farmer’s market to buy lots of rhubarb.

Julio liked the flowers but he loved the rhubarb even more, so today I will tell you about that. Specifically, I will be discussing strawberry-rhubarb sorbet. I find fruit sorbets even more refreshing than ice cream on hot days, so this was a perfectly light dessert last Sunday when the weather was particularly sweltering. Plus, the dish managed to keep both its strawberry and rhubarb flavors beautifully, with just the right amount of sweetness. My rhubarb was not very pink, but the strawberries were more than able to balance the color.

We served the sorbet with delicate little cookies called punitions, or punishments. (Legend has it that grandmothers used to call their grandchildren in by letting them know their punishment was ready. I can’t imagine it took much convincing to receive this type of punishment.) These French cookies are thin and buttery, with a sandy texture. Alone, the cookies are a bit plain, but that didn’t stop me from eating plenty of them. With the sorbet, I thought the cookies provided a needed textural contrast, particularly when built into a sorbet sandwich. As a garnish to the sorbet alone, I will choose a crisper cookie next time so that one can have just a bite or two of crunch with the refreshing sorbet.

Strawberry-Rhubarb Sorbet
Adapted from The Perfect Scoop by David Lebovitz

Ingredients
14 oz rhubarb, washed and cut into 1/2 inch pieces
2/3 cup (160ml) water
3/4 cup (150g) sugar
10 oz fresh strawberries, washed, hulled, and sliced
1 teaspoon lemon juice

Place water, rhubarb, and sugar into a medium pot and bring to a boil. Reduce heat, cover the pot, and simmer the mixture for 5-8 minutes. The rhubarb should be tender. Remove mixture from heat and cool to room temperature.

Once the rhubarb has cooled, puree the rhubarb mixture with the strawberries and lemon juice in a blender or food processor until smooth.

Chill the mixture thoroughly (this will take a couple of hours) and then freeze it in an ice cream maker according to the instructions for the ice cream maker.

Punishments (Punitions)
Adapted from Paris Sweets by Dorie Greenspan

Ingredients
10 Tbsp (140g) unsalted butter, at room temperature
Slightly rounded 1/2 cup (125 g) sugar
1 large egg, at room temperature
2 cups (280 g) all-purpose flour

Place the butter in the work bowl of a food processor fitted with the metal blade and process, scraping down the sides of the bowl as needed, until the butter is smooth. Add the sugar and process until thoroughly blended into the butter. Add the egg and continue to process, scraping the bowl as needed, until the mixture is smooth and satiny. Add the flour all at once, then pulse 10 to 15 times, until the dough forms clumps and curds and looks like streusel. If you don’t have a food processor, feel free to do these steps by mixing by hand.

Gather the dough into a ball and separate it in half. Shape each half into a disk and wrap the disks in plastic. Chill the disks until they are firm, about 4 hours. If you’re in a hurry, you can roll the dough out immediately; it will be a little stickier, but fine. The dough can be wrapped airtight and refrigerated for up to 7 days or frozen for up to 1 month.

Working with one disk at a time, roll the dough out on a lightly floured surface until it is between 1/8 and 1/4 inch thick. Using a 1 1/2-inch round cookie cutter, cut out as many cookies as you can and place them on lined baking sheets, leaving about 1 inch between them. You can gather the scraps into a disk and chill them, then roll, cut, and bake them later.

Bake the cookies for 8 to 10 minutes in a preheated 350°F oven, or until they are set but pale. If some of the cookies are thinner than the others, the thin ones may brown around the edges, which is fine. Transfer the cookies to cooling racks to cool to room temperature. This recipe makes ~4 dozen cookies.

the best Lithuanian-themed party

By Sarah

I am not much of a party person. I just don’t find parties very exciting. I don’t understand why I would want to stand in a room, crowded with people, music blaring and just talk. If I want to talk with someone, I choose to do it sitting down, in an environment where I’m not competing with loud music and dozens of other people.

Julio, on the other hand, adores parties. He would attend a party every night if we let him.

So I try to compromise with the boy. I’m actually just not much of a standing-around-and-talking-party person. I do like other parties. I love dinner parties, for obvious reasons. And dance parties are a wonderful thing; if you just take that other kind of party mentioned above and let me dance (and preferably not be the only one dancing), I am perfectly happy. Oh yes, and I also like themed parties. When a party is an excuse to dress as something else or reminisce about a previous era, the event is vastly improved. So Julio and I are both happy.

I also like planning parties, especially themed parties. So, naturally, when Andrés suggested hosting a Lithuanian-themed party in honor of his Lithuanian heritage/citizenship, I immediately started preparations. This wouldn’t just be a party, it would be the best Lithuanian-themed party our guests had ever attended. We would have Lithuanian food, Lithuanian drinks, and Lithuanian games. Not just standing around and talking, but talking about Lithuania.

The party, which took place on Saturday, was a success. There was a lot of fun, a lot of guests, and a lot of Lithuania. But mostly, there was a lot of food. When everything was over, we couldn’t even fit the leftovers into the fridge!

One of the few items that did disappear, and disappeared quickly, was a traditional Lithuanian drink I had made for the occasion. This is a pretty divisive drink, either you really like it or you really don’t want to take a second sip. It is made from honey and water, which is quickly fermented by yeast (causing it to become bubbly and sour but still have a low alcohol content, only 1-2%). After fermentation you add raisins and lemon juice to balance the flavors. The flavors, in case you’re curious, were described both as “soda-like” and “sangria-like.” While I was on the not-another-sip side of the aisle, I will certainly be making another batch for our next Lithuanian party. And I also owe a bottle to the trivia winners, who requested it over a bottle of wine.

Another dish I made, not quite as popular as the Kvass (which I think won for its originality), but much tastier (in my opinion) and more versatile were these poppyseed cookies. The recipe isn’t authentic Lithuanian, but I thought it seemed Lithuanian-inspired. Plus, cookies make every party better.

Andrés will let you know about the other, more authentic, Lithuanian dishes he made for the party soon. I hope you can wait!

Lithuanian Honey Kvass
Medaus gira
Adapted from a website of Lithuanian recipes

Ingredients:
2 cups honey
5 liters water
20g (4 tsp) yeast
1 cup raisins
juice of two lemons

Bring water to a boil and add honey, stirring until it has completely dissolved. Allow honey-water to cool until it is ~110 F. Add yeast and allow mixture to ferment for ~24hrs in a warm place, until a layer of foam develops on the top of the mixture. Remove the foam. Add raisins and lemon juice, then bottle the kvass and store in a cool place.

Poppy Seed Wafers
From Good to the Grain by Kim Boyce through Thin Crust, Deep Dish

Ingredients:
1/4 cup plus 2 Tablespoons heavy cream
2 egg yolks (save whites)
1 1/2 cups buckwheat flour
1 cup all purpose flour
3/4 cup sugar
1 1/2 tsp salt
12 tbsps (6 oz) unsalted butter, at room temperature

2 tbsps sugar
2 tbsps poppy seeds
egg whites

Sift dry ingredients into a bowl. Using your fingers, squeeze the butter into the dry ingredients until crumbly.  Add cream and egg yolks and continue squeezing with your hands until the texture comes together.

Divide the dough in half and roll each piece into a log that is  3/4-in wide, flouring the dough and work surface as necessary.  Wrap each log in plastic and chill for two hours.

Mix sugar and poppy seeds for topping and spread out on a flat surface.  Brush one log with egg whites and roll in the poppy seed mixture until evenly coated.  Repeat process with other log, then slice logs into 1/8-in thin wafers with a sharp knife and place on lined cookie sheets.

Bake the cookies for 15-17 minutes in a preheated 350 F, rotating the sheets halfway through.  The wafers are done when they are a dark golden-brown with a darker ring around the edge.  They should smell quite nutty.

Vatan: Fantastic Indian Vegetarian Fare

By Sarah

Julio loves it when we have visitors. He loves that there are extra plates to lick, that there are more opportunities for petting, and that he’s more likely to be able to bend the rules a little bit. Rules, like not jumping up on someone’s lap without being invited, disappear quickly when there are new people in the apartment. This past weekend, for example, my parents visited and Julio was not only left unreprimanded after jumping up on many laps, he got away with cuddling between them through an entire night. It must be nice to be so cute that people let you get away with just about anything, like joining them in bed. And pet you for it too.

In addition to showering their “granddog” with lots of love and attention, my parents (and I) spent the weekend walking around the city, enjoying its sights and playing tourist. For me the highlight, besides just enjoying their company, was our dinner Friday night at the northern Indian (Gujarati) restaurant Vatan. Andrés first heard of this place from our Indian friends, who consider it one of the best in the city. Then Andrés’s father took us to Vatan over a year ago and it had stood out in my mind as a truly wonderful meal. Yet, for some unknown reason, I had never made it back. Silly me.

The restaurant serves a set menu, a kind of all you can eat buffet, but not what you’re thinking. Our waitress graciously brought three courses to our table, serving each of us a full tray of new, interesting food items. That’s one of the reasons I really wanted to take my parents here: you get to try so many different foods and yet you never have to make a decision. Another reason is that the decor and costumes, while a bit cheesy, do make you feel like you’re escaping to an exotic land.

Above is just the main course, which includes, clockwise from bottom left,  kheer (yogurt with fruit), chole (chickpeas with tamarind), ful-cobi (cauliflower with green peas), bhaji (spinach with corn), batakanu sak (potatoes in a tomato sauce), puri (puffed bread), toor dal (lentil soup), and papadam (cracker, center).

It’s enough to fill you up, but there’s also an appetizer course with just as many items, plus family-style sides, and ice cream and chai tea for dessert. And the most amazing part is that everything is delicious. I will certainly not wait another year to eat again at Vatan.

Oatmeal-White Chocolate cookies

By Sarah

I have a serious sweet tooth. I mean serious. I will eat just about anything that’s sweet: hard candy, soft candy, all sorts of sweet baked goods, even pure sugar when I really have a craving. But my favorite way to eat sweet is paired with something salty. That’s the beautiful thing about salt, it enhances the flavor of whatever you’re eating making it just, well, better.

That’s also the beautiful part about these cookies. They’re sweet, after all they’re cookies, but they also have serious saltiness going on. Plus oatmeal. And white chocolate. And they’re crispy. Need I say more? Okay, if you’re not a white chocolate fan I think they will be equally delicious without it. And if you’re not a fan of really crispy cookies, know that this isn’t like standard cookie crispiness. It’s more delicious, with little air pockets inside. Exhibit A:

Crispy Oatmeal-White Chocolate Cookies
Adapted from the Smitten Kitchen who got the recipe from Cook’s Illustrated

1 cup all-purpose flour
3/4 teaspoon baking powder
1/2 teaspoon baking soda
1/4 teaspoon salt
14 tablespoons (1 3/4 sticks) unsalted butter, slightly softened
3/4 cup sugar
1/4 cup light brown sugar
1 large egg
1 teaspoon vanilla
2 1/2 cups old-fashioned rolled oats (not instant)
6 ounces white chocolate, chopped
flaky sea salt

Whisk flour, baking powder, baking soda, and salt in a medium bowl.

Beat butter and sugars until light and fluffy in a separate bowl. Scrape down bowl with rubber spatula, then add egg and vanilla and beat until incorporated. Scrape down bowl again. Add flour mixture gradually and mix until just incorporated and smooth. Gradually add oats and white chocolate and mix until well incorporated.

Divide dough into 24 equal portions, each about 2 tablespoons. Roll into balls, then place on lined baking sheets about 2 1/2 inches apart. Using fingertips, gently press down each dough ball to about 3/4-inch thickness. Sprinkle a couple of flakes of sea salt on each cookie.

Bake cookies in a 350 degree preheated oven, until they are deep golden brown, about 13 to 16 minutes. Allow cookies to cool for 3-5 minutes before removing them from the pan. I found these cookies most delicious when they had completely cooled down.

Spring bolognese

By Sarah

Spring has always been my favorite season. In Minnesota, spring is a sloppy, muddy mess, and, as a child, I absolutely adored jumping through the puddles as the snow melted.  And walking on the thin layer of ice after that same melted snow refroze during cold nights. Of course I also loved the flowers which appeared in late spring and watching the entire natural world come back to life.  Spring is so lovely, isn’t it.

Dear spring, however, is also very fickle. For a day or two she will tease you with sultry warm weather and then all of a sudden she gives you the cold shoulder. Case in point, last Saturday I spent a lovely day in my floppiest spring skirt eating a picnic in Central Park with my two favorite boys, enjoying 70 degree weather. Yesterday I had to bring out my thickest down coat, ear warmer, and gloves just to bring Julio out for his walk, which I did grudgingly because after such a warm streak the cold is especially bitter.

Anyways, all of this is to explain why I am sharing a winter recipe with you when it’s springtime and, in just a day or two, may be another balmy 70 degree day. But right now it’s cold and all I can think of is bolognese.

This bolognese recipe is thoroughly hearty and will warm you right up if you’re also experiencing chilly weather. But it’s not your traditional bolognese and so, might I suggest, that we think of this as spring bolognese? You see it’s made with fish (yes, fish!) and I think of fish as summer fare, so the fish bolognese is right in between, like a spring day. (Am I trying too hard? My apologies.)

The recipe comes from the restaurant Esca, one of our favorite seafood restaurants in the city. It’s a lovely place which combines extremely fresh fish with more traditional Italian cooking. Which of course, also, describes this recipe perfectly. We loved this very comforting dish and, honestly, you can’t even tell that it isn’t a traditional meat bolognese. As it is, it’s not fishetarian friendly, but if someone tries exchanging/omitting the pancetta please let me know how it works.

Rigatoni with Tuna Bolognese
From David Pasternack in The Young Man and the Sea

2 pounds fresh tuna scraps or steaks , cut into large chunks
10 ounces pancetta
6 ounces mackerel, but into large chucks (we used blue fish)
3 tablespoons olive oil
1 onion, diced
4 cloves garlic, crushed
1 bottle (750ml) red wine
1 bay leaf
1/2 cinnamon stick (about 2 inches long)
1 teaspoon red pepper flakes
28-ounce can whole peeled tomatoes and their juice
salt
black pepper
1 pound rigatoni
1/2 pound mascarpone cheese

In a food processor, pulse the tuna, pancetta, and mackerel until coarsely ground. Set aside.

In a large pot over medium heat, heat the olive oil. Add the onion and garlic and cook, stirring, until translucent, which takes ~4 minutes. Add the tuna mixture and turn heat to high. Cook, stirring with a fork until the juices run dry and the fish begins to brown, 7 to 10 minutes. Add the red wine, bay leaf, red pepper, and cinnamon stick, and cook until dry, about 15 minutes. Add the tomatoes, crushing them by hand, and 1/2 cup water. Season with 1 teaspoon salt and 1/2 teaspoon black pepper. Let simmer, uncovered, for 1 1/2 hours. The sauce should be moist but not wet. Season more with salt and pepper; remove bay leaf and cinnamon stick.

Prepare the rigatoni according to the package instructions, cooking 1 minute less than suggested for al dente. Drain in a colander and and combine with the bolognese sauce. Divide among serving bowls and top each serving with mascarpone cheese.

Sarah’s Notes: This recipe is supposed to serve four and so we made half of the sauce, but then I looked at, and, unsurprisingly, there was a ton of bolognese (the recipe does call for 3 lbs of meat/fish!). So we used a full pound of pasta (double the amount for our half recipe) and had enough food for more than 5 servings. If you go to the restaurant the proportions are on the small side so I’m not sure who thought this would only serve 4 people. Also, I was going to skip the mascarpone, and was very glad I didn’t. The sauce is so heavy it needs the cheese to lighten it up (I know, it’s hard to believe that a thick creamy cheese would do this, but compared to pancetta/tuna in wine sauce it does seem light!).

Shepherd’s Pie

By Sarah

There are two Irish pubs a block away from my apartment and tonight they are filled — no, overflowing — with people in green shirts. And shiny green beads. And the occasional Leprechaun hat.

But I’m boycotting these pubs and it has nothing to do with the color green. You see these places are just that: neighborhood pubs. The food is okay and the beer menu is lengthy, and it’s so close by that I’ve found myself sitting at one of their back tables on a number of occasions because we want a simple meal without cooking. Or just have to see a particular sports game. Or it’s late and nothing else is open. Last time I went to my favorite of the two, I didn’t even look on the menu before ordering my standard Shepherd’s Pie.

But they didn’t have any. Not just that night. They had taken the Shepherd’s Pie off the menu!! What’s an Irish pub without Shepherd’s Pie?

Well, by the looks of it when I walked by this evening, the pub is doing just fine.

But I’m not. Although I can go quite long periods of time without eating any meat, sometimes I need my fix and a hearty meat stew just has to be found. Or made.

Since Shepherd’s Pie is really peasant food, I thought it was appropriate to use whatever I had on hand instead of making a trip to the grocery store. So that means my mashed potatoes were half turnips and I used cider instead of the dark beer (which isn’t actually in the original recipe, but I’m sure that was an oversight), but the recipe below is the original (exception: beer) so that you can make your own modifications.

Happy St. Patty’s Day!

Shepherd’s Pie
Adapted from Victoria Granof in Cookie

Ingredients
1 Tbsp vegetable oil
1 onion, chopped
1 large carrot, peeled and chopped
1 lb ground lamb (I used beef)
1 dark beer + chicken bouillon to make one cup broth (or just 1 cup chicken broth)
1 tablespoon tomato paste (I used tomato sauce/canned tomatoes to make 1/2 cup)
1 teaspoon fresh rosemary (I used 1/2 tsp dry rosemary)
1 tablespoon chopped parsley
1 cup frozen potatoes
2 lbs potatoes
6 Tbsp butter
1/2 cup milk
salt to taste

In a large pan over medium-high heat, heat the oil, then add the onion, carrot, and meat. Cook until browned, 8 to 10 minutes.

Drain the fat and add the beer, bouillon, tomato paste, and herbs. Simmer until the juices thicken, about 10 minutes, then add the peas. Pour the mixture into a 1 1/2-quart baking dish; set aside.

Meanwhile, bring the potatoes to a boil in salted water. Cook until tender, about 20 minutes; drain. Mash the potatoes with the butter, milk, and salt.

Spread the potatoes over the meat mixture. Bake until golden, 30 to 35 minutes.

*I actually liked this dish best after I had it sit in the fridge for a day or two and then reheated it.